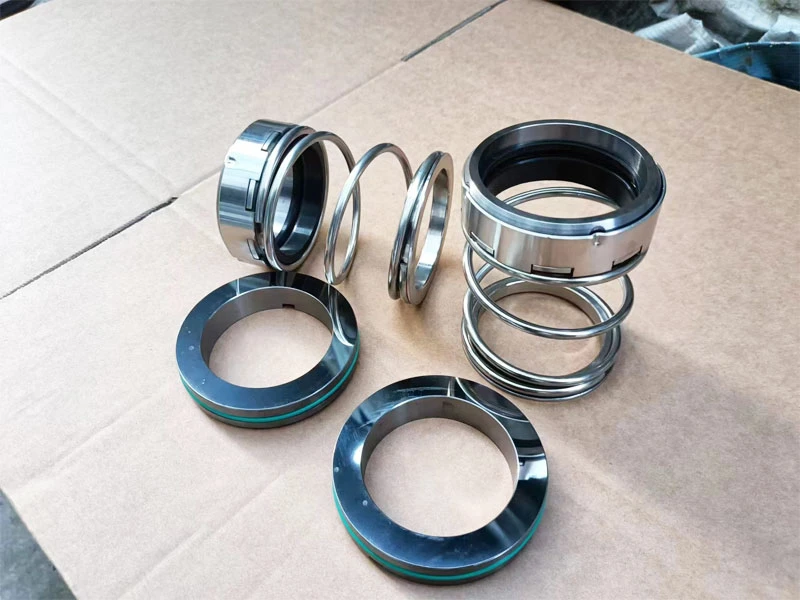
installation de la garniture mécanique de la pompe à mission
1. Dépose de l'ancienne garniture mécanique
Lors du remplacement de la garniture mécanique d'une pompe à mission, il faut d'abord retirer l'ancienne garniture. Avant de procéder au démontage, assurez-vous que la pompe à mission est hors tension et déconnectée de l'alimentation électrique principale afin de garantir un fonctionnement sûr. Ensuite, suivez les étapes ci-dessous pour démonter la pompe :
1. Déposer symétriquement les vis du couvercle d'extrémité du corps de la pompe et retirer délicatement le couvercle de la pompe. Veillez à ne pas endommager le couvercle de la pompe et les vis lors de la dépose.
2. Retirer complètement le moteur et la roue. Pour les grandes pompes de mission, si la roue est difficile à retirer, utilisez les trous de vis du couvercle de la pompe pour la pousser vers l'extérieur. Veillez à ne pas heurter le moteur et la roue lors de leur dépose.
3. Après avoir retiré la roue, les anneaux dynamiques et statiques de la garniture mécanique seront visibles. Utilisez des outils spécialisés pour retirer délicatement les anneaux dynamiques et statiques. Veillez à ne pas endommager les surfaces d'étanchéité des anneaux dynamiques et statiques lors du retrait.
4. Nettoyer les composants de la garniture mécanique qui ont été retirés et vérifier qu'ils ne sont pas endommagés ou très usés. Remplacer les composants si nécessaire.
installation de la garniture mécanique de la pompe à mission
2. Installation d'une nouvelle garniture mécanique
Après avoir retiré l'ancienne garniture mécanique, vous devez en installer une nouvelle. Avant l'installation, assurez-vous que les nouveaux composants de la garniture mécanique sont prêts et vérifiez qu'ils ne sont pas endommagés. Suivez les étapes ci-dessous pour l'installation :
1. Nettoyez l'arbre de la pompe et la gorge du segment fixe, en veillant à ce qu'ils soient propres et exempts de débris. Appliquer une quantité généreuse de graisse sur l'arbre de la pompe et la gorge de la bague fixe pour assurer une installation en douceur.
2. Installer la nouvelle bague fixe dans la gorge de la bague fixe, en veillant à ce qu'elle soit plate et non inclinée. S'assurer que la surface d'étanchéité de la bague fixe est orientée vers le haut.
3. Appliquer de la graisse sur la bague intérieure et la face d'extrémité de la bague rotative, puis la fixer contre la face d'extrémité de la bague fixe. Au cours de ce processus, assurez-vous que la bague rotative peut s'étendre et se rétracter librement sans aucun blocage.
4. Faites glisser la roue sur l'arbre de la pompe, en utilisant un petit bloc de bois pour amortir la roue. Tapez doucement avec un marteau pour fixer la roue en place. Ensuite, serrez les vis de maintien de la roue pour vous assurer qu'elles sont bien fixées et qu'elles ne sont pas desserrées.
5. Insérer le moteur et la roue dans le corps de la pompe, en prenant soin d'éviter tout choc ou frottement lors de l'insertion. Ajustez la position de la roue pour assurer une rotation fluide sans obstruction. Ensuite, serrer uniformément les vis du capuchon d'extrémité pour terminer l'installation.
6. Démarrer le pompe de mission pour un essai de fonctionnement afin de vérifier que la nouvelle garniture mécanique est correctement installée et qu'elle ne présente aucune fuite. Si des anomalies sont détectées, il faut immédiatement arrêter la machine pour l'inspecter et procéder à des ajustements.
Grâce à ces étapes, vous pouvez mener à bien le remplacement du garniture mécanique de la pompe à mission. Pendant le fonctionnement, veillez à ce que l'environnement soit propre et ordonné afin d'éviter que des débris et de la poussière ne pénètrent dans la zone de la garniture, ce qui pourrait affecter l'effet d'étanchéité. L'inspection et l'entretien réguliers de la garniture mécanique sont également importants pour garantir son bon fonctionnement et prolonger sa durée de vie.
 Chat avec l'ingénieur