A Pump för uppdrag En Mission-pump används vanligen för dränering, slam- och sandtransport. Pumphjulet är en nyckelkomponent som har en direkt inverkan på pumpens prestanda och effektivitet. Korrekt borttagning av impellern är avgörande för underhåll och reparation av sandpumpar. Nedan beskrivs hur man tar bort en Mission-pumps impeller, så att operatören kan ta bort och byta ut den på rätt sätt när [...].
1. Säkerhetsåtgärder
Innan du utför reparations- eller demonteringsarbeten på mekanisk utrustning ska du se till att relevanta säkerhetsföreskrifter följs. Använd nödvändig skyddsutrustning, t.ex. hjälm, handskar och skyddsglasögon, och se till att arbetsplatsen har tillräcklig ventilation för att förhindra olyckor som orsakas av giftiga gaser.
2. Koppla bort strömförsörjningen och hydraulsystemet
Innan du tar bort sandpumpens pumphjul, se till att koppla bort strömförsörjningen och hydraulsystemet för att förhindra skador från oavsiktlig start. Om sandpump är elektrisk ska strömförsörjningen kopplas bort; om den är hydrauliskt driven ska hydraulsystemet stängas av.
3. Ta bort inlopps- och utloppsrören
Innan du tar bort pumphjulet ska du ta bort inlopps- och utloppsrören som är anslutna till sandpumpen för att ge bättre åtkomst till pumphjulets komponenter. Använd lämpliga verktyg för att lossa röranslutningsbultarna och se till att rören inte skadas.
4. Ta bort pumphjulets mutter
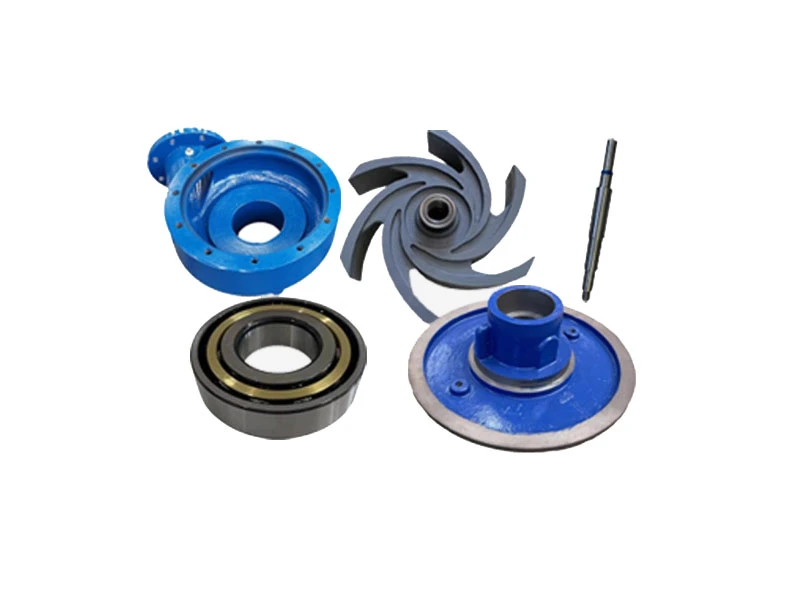
Det finns vanligtvis en fästmutter i mitten av pumphjulet som håller fast det på pumpaxeln. Använd en skiftnyckel eller annat lämpligt verktyg för att lossa muttern moturs. Låt en medhjälpare hålla i pumphjulet medan muttern lossas för att förhindra att det roterar och orsakar skador.
5. Ta bort pumphjulet
När muttern är helt lossad tar du försiktigt bort pumphjulet från pumpaxeln. Om det finns några fästelement (t.ex. stift) som håller fast pumphjulet på pumpaxeln, ta bort dem försiktigt. Var försiktig så att du inte använder för mycket kraft när du tar bort pumphjulet, så att du inte skadar pumphjulet eller pumpaxeln.
6. Inspektera och rengör
Det borttagna pumphjulet måste inspekteras och rengöras. Inspektera pumphjulet med avseende på tecken på slitage, korrosion eller sprickor. Om några sådana finns ska de omedelbart bytas ut. Rengör också pumphjulets in- och utsida så att det inte finns några orenheter eller avlagringar. Detta förlänger impellerns livslängd.
7. Installera ett nytt pumphjul
Om pumphjulet behöver bytas ut, följ dessa steg i omvänd ordning för att installera det nya pumphjulet. Placera först impellern på pumpaxeln och fäst den med muttern. När du drar åt muttern ska du se till att pumphjulet är i linje med pumpaxeln och inte har någon felinställning. Installera sedan om inlopps- och utloppsrören och se till att de är ordentligt anslutna.
8. Systemtest
Efter byte av pumphjulet ska strömförsörjningen och hydraulsystemet återanslutas. Starta uppdragspumpen och observera dess funktion. Kontrollera att det inte förekommer några onormala ljud eller vibrationer och att dränerings- och transportprestanda är normala.
Med hjälp av ovanstående steg kan borttagning och byte av Impeller för uppdragspump är nu slutförd. Var ytterst försiktig under denna operation, se till att din personliga säkerhet garanteras och följ relevanta driftsprocedurer för att undvika skador på utrustningen eller personskador.
 Chatta med ingenjör